Dawn(SandyBottom) and son Alan(SOS) have left the building and are on the road to Florida after a flurry of packing and last-minute efforts in preparation for another WaterTribe adventure race.
This year their race is the 1200 mile Ultimate Florida Challenge ---complete a 300 mile Everglades Challenge and then continue all the way around Florida.
This will be SandyBottom's third UFC. She's bringing her A-game and a 17' Kruger Dreamcatcher. For his second UFC, SOS has designed and built a sloop-rigged decked Expedition Sailing Canoe. Both have also brought along tiny folding bikes for the 40-mile portage across northern Florida.
WaterTribe races have two parts: 1) uphill out of breath working after hours to finally reach the starting line, 2) downhill sailing away into a great adventure toward the finish line. Part 1 is expensive and may involve wintery paddling and sailing in icy waters, struggles toward improved physical fitness, burning the candle at both ends, and sleep deprivation caused by an insane boat-building urge.
Having made it to the starting line, the participants feel a great sense of accomplishment. The challenges of getting it all together are history. The long drive south is done. The weather in Florida is better -ish. Old friends are on hand and there is time to party (for those who are not still building a boat). And for some, there is finally that opportunity to get in the water and see if the boat actually does float!
So yes; the race is on. It's been on for several months, weeks or days, depending on one's ability to procrastinate. Around here the dust from Part 1 of the race is still flying. There was a whirlwind of last-minute intense activity until a moment ago. Somehow all that stuff that looked like it would never fit into the van ... it did.
Now this place looks like an REI that was hit by a tornado that scatter redundant gear, unneeded dry-bags, superfluous items, empty wrappers and boxes, spare anchors and lines, miscellaneous tools and materials, notepads with checked-off checklists, rejected containers of food, unfinished ideas and abandoned non-essentials.
Dozens of WaterTribers from across the country are now traveling south toward that starting line on that beach in Tampa Bay. They are all wondering what they may have forgotten, hoping they remembered everything, and calculating mentally whether they have enough --but not too much. If they are lucky they can take turns drivng and catch up on all that lost sleep.
This is Paul Stewart (a.k.a.DancesWithSandyBottom) reporting for SOS and SandyBottom. I will try to post updates as Part 2 of the race begins.
Yesterday I had the first sail of the new sailing canoe. I was more than pleased with her performance and also very happy that I have a few days now to do the necessary rescue and capsize practice which I will try to video as well.
It was evening so I only had her out for about 20 minutes. I covered 1.2 miles with a top speed of 6.7 knots. I still have some small rigging issues to work out such as a mainsheet cleat and second reef point and a better friction fit between the hull and leeboard. I had the first reef in because it was a bit windy 10 gusts to 15 maybe and I didn't yet know exactly how she would handle. The reef gets shake'd out at the 9 minute mark.
You can see in the video the amas pivoting with the waves. They are free to rotate on the crossbeams up and down about 10 degrees either way. This was on the suggestion of Meade Gougeon who used this method on his sailing canoe and it worked great.
The only real design change that I am considering is making the central crossbeam tube longer which would increase the beam of the boat from about 11' 4" to maybe 12' feet. I don't want to make the boat too wide but she seemed to want a little more beam. I may also include a hiking board for heavier air upwind work.
The boat was empty during this test sail so her performance was naturally a bit better than it will be loaded down but I had not proofed the hatches yet and wanted to test them out. They were bone dry after sailing and after blasting them around the edges with a high pressure garden hose afterward.
I hope to do a "walkaroud" video later to describe all the rigging to everyone who may not be able to inspect her on the beach at the start of the Watertribe Everglades Challenge /UFC.
Finally figured out something good to do with those darn watertribe paddles. A birthday present for dad. AKA DancesWithSandyBottom in Watertribe. Happy Birthday to the best Dad ever.
Well, ok but not quite. I wanted to get another blog post done before I won't really have time. I have updated the photo album to the current day with 174 additional pictures so check them out here. The sailing canoe is painted and almost ready for paddling/sailing trials. Mast, sail, crossbeams and amas all are nearing completion. Soon I will be on the water doing some sailing, paddling and rescue drills.
A note on safety:
I will not be entering the race (the UFC in this case) unless I have time to sail and paddle the canoe in all of its configurations and complete rescue practice with simulated failures (missing ama/crossbeam) in all configurations. I would be literally "risking my life" if I was not able to regain control of the canoe in the event of capsize. Everyone should do rescue practice before going out of reach of help.
Now, I know what your thinking....Yes, my dad and I launched our CS-20 in 2008 fresh out of the workshop and into the Everglades Challenge but we were a 2 person team and the CS-20 design was well founded and well established. And yes, I did launch a 22' Trimaran in 2012 fresh out of the workshop (sailed only once before) and had some issues with it along the way. But it was also a 2 person team and we did not push the boat very hard. This year is the first year I will be sailing solo and in a smaller craft. For that reason, I am more cautious even if my mother is convinced otherwise (love you mom).
Getting back to the build, here is a little more info about how the design has evolved and some of the systems.
Then (above) and now(below)
Hiking vs. Sitting:
Originally, the idea was to use a relatively narrow beam and rely partly on hiking benches with ama backup. The advantages would be less ama interference with the water which would make the boat more upwind capable (that was the thought process anyway). This idea was thrown out mainly because it is not conducive to distance sailing. The new platform is about 11' wide with amas of approximately 70lb displacement. If there is time I will experiment with a hiking board which would be clamped transverse across the cockpit to allow for sitting up and out of the cockpit making for a dryer ride and more righting moment.
Crossbeams:
The crossbeam consists of 3 pieces of aluminum tube joined with fiberglass collars for a slip fit. A central tube (purple) with smaller tubes outboard (green). This is the best configuration for strength rather than joining the tubes in the center and it is a more efficient use of cross sections because it is a better approximation of a tapered beam. Another unique feature is that the central tube can slide from side to side with 3 configurations. "Centered" in which the amas provide equal righting moment on either tack. Or "Asymmetric" either shifted port or starboard. This will come in handy on those loooong tacks down the coast because with the leeward ama slid farther out producing more righting moment, the boat will sail flatter and stiffer. An added benefit of this feature is for camping, the crossbeam can put in the asymmetric position to provide a platform for camping aboard that will not rock back and forth with every movement of the sleepy sailor.
Amas:
The amas are sculpted from solid 2lb density 2" blue foam fiber-glassed on the outside. They are approximately 8" tall by 6" wide and 63" in length. They easily fit inside the forward part of the main hull through the circular hatch. There is enough room left in the forward section for lots of gear. Mast and crossbeam tubes will also be stored there when in the paddling configuration.
The amas will join to the crossbeams with a bracket that consists of a tube that slides onto the outboard crossbeam connected to a set of vertical "ears" and a saddle that matches the contor of the ama. The bracket will be bolted to the ama. The bracket must be removable so that the ama can be stored inside the main hull.
The bracket allows the ama to freely pivot about the axis of the crossbeam, a feature pioneered by Meade Gougeon and applied successfully in his sailing canoe. Limits for the ama's rotation will prevent the ama from rotating past about 5 degrees. The center of bouancy of the ama is slightly ahead of the crossbeam so that the ama will want to pitch up when pressed.
The Mast:
The mast is constructed of 4 aluminum tubes the longest of which is 5 feet. Similar to the crossbeams, the mast is joined using the B&B system of fiberglass collars sanded down for a slip fit. Button clips will secure the tubes together and keep them secure. Each mast tube will have a foam plug glued into the ends so that each piece is individually buoyant.
The Sail:
The sail is a stock Spindirft 9 sail from the B&B inventory which comes with a single slab reef designed for single line reefining. A second reefing point will be added as a "deep reef" to satisfy the reefing rules. The sail has a zippered sleeve luff which is desirable for reducing drag. The sleeve is cutaway for the first reef. This allows the first reef to be put in in a matter of seconds by lowering the halyard to a predetermined spot and pulling in the single reefing line. The second reef will require unzipping the luff to the new tack position, lowering the sail with the halyard and pulling in the second reefing line.
Portage:
The portage cart is made of a 2" aluminum tube with stub axles. The wheels are 16" utility wheels from northern tool. The cradles are homemade and bolt to the aluminum tube.
The folding bicycle is a Vilano Urnaba single speed coaster hub it was a great deal found on amazon. Total weight is 21 lbs. The stock bike came with 20" wheels. I replaced them with 16" wheels by Avenir. Front and Rear. The smaller wheels lowered the pedals to within about an inch and a half to the ground but the bike is still easily ride-able and I can't make sharp turns with the boat in tow anyway. I also purchased some larger sprockets to replace the 16 tooth one that came stock. A 22 tooth sprocket was still too high of a gear (this is the configuration in the video above). A local bike shop did a great job installing a new 44 tooth crank in the front to replace the 57 tooth that it came with. Now the gearing is nice and low. About 6mph at a cadence of about 80 to 90 rpm.
Even with a boatload of other projects going, I managed to get some more work done on the new sailing canoe over the last couple of weeks. Yesterday I glued up the rudder blank. The full gallery of build pictures can be seen here. B&B UFC Canoe build.
The hull is now all glassed and ready for paint but I will be finishing up the hatches and rudder before that. Then she will be paddle-able while I complete the sail rig.
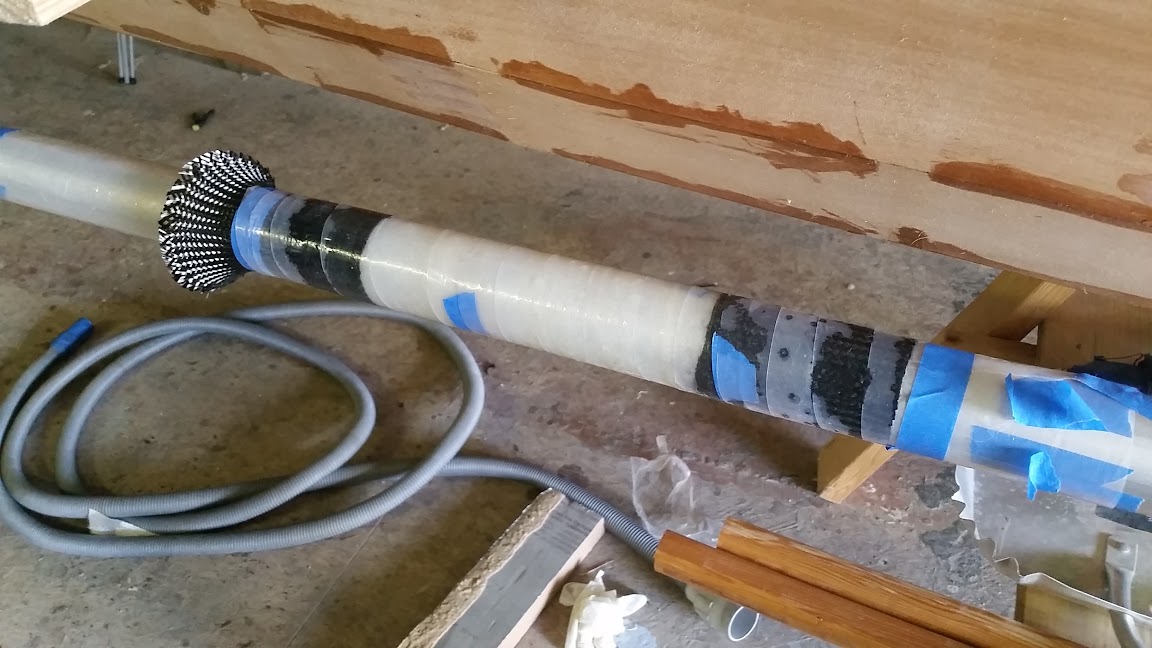
I made my mast step with some leftover carbon sleeve from Graham's EC22 masts. It was not necessary but I wanted to experiment. I was able to lay up the tube with the bottom portion masked off which allowed me to glass the tube to the hull with a big carbon flange after the tube cured. Below you can see the tube installed.
The bulkheads were finally glassed in with some bias cut glass scraps. I'm using 4oz S-glass throughout. The extra cost is justified because it is a small boat. Almost all of the scraps leftover from glassing the hull go to good use.
The deck is attached to the hull with hot glue and small wood bits which allow the hull and deck joint to be precisely joined. Once the deck and hull were joined, the inside was glassed with thickened epoxy and 2" glass tape. I used tape in the ends of the hull because it is easier to roll and unroll in place than cut strips. Once the interior hull/deck joint is fully glassed, the blocks are twisted off and a small chisel was used to gouge all of the hot glue out of the joint on the outside. Then the outside of the hull was given a good sanding and all remaining voids were filled.
The inside is glassed.
The bottom was glassed first and the glass was trimmed just past the hull/deck joint. It took 2 pieces to glass the bottom and the joint was left offset from center just to more efficiently use the glass. Then the deck was glassed all in one piece. That was tricky. Peel ply was used all over. I am undecided if it was worth the extra work but I believe so.
The completed hull glassed inside and out weighed in at 43lbs.
The forward hatch I decided to do rounded for extra strength and a nicer look. Originally I planned to just bend 4mm plywood but decided to do a striped top which won't try to spring back and won't require beams underneath. The strips are 3/16" basswood 1" wide with a 5 deg bevel cut on one side of each strip. The top will be sanded round and then the hatch rim put on in plywood before glassing top and bottom.
The stern and cockpit hatches are 4mm plywood flat panels with bent 4mm ply rims. A heat gun was used to "dry bend" the plywood. Long clamps and patience are required to achieve the hatch below. A plywood strip on the outside takes care of the end moment at the bitter ends of the joint. Once it's in place, a fillet is applied to the inside and then the screws can be removed.
The rudder blank is glued up and will be CNC machined to shape.