Sunday, October 09, 2011

Ama: tortured but alive

You know why they call it Tortured Plywood right?... Because sometimes it dies.

Fortunately the starboard Ama (on which I am now working) underwent severe torture today but the plywood told me what I wanted to know so I let it live. All in all a very satisfying shape achieved (more pics tomorrow). Below is the challenge. Turn flat panels into the wave piercing round bottomed form of a fast ama 1/2 shape at left. After determining what 2d shape I wanted to start with (part, geometry, part "maybe this will work") I joined the panels with a finger joint and stitched them together.

A pictoral journey of the events that followed can be seen below. I knew there would be some compromise in my desired hulls shape something I learned on the main hull but I wanted to really push the tortured shape to the limit of what I thought was possible and I don't think I could have gotten any more out of it. Then again, it didn't crack so who knows.

It was obvious to me that my desired bow shape was going to be a problem so I cut two splits in the bow section 40" long following an isoline from the tip of the bow and curving up along a line of max curvature. By re-stitching these, I could set them at an angle and help the curvature process. It also let me lock in the shape in that area so I don't end up with too fine a bottom near the bow. I have never seen this method used with torturing so I guess I'll call it "split-tortured plywood". The rest of the keel was glassed together over a generous fillet of 3.75" diameter with 20 degrees of deadrise. This angle is crucial to making it work. The smaller the deadrise you set at the get go the more compound curvature your asking for. Unlike the main hull, the ama is made of just two panels.

While the seams were curing I whacked out the bulkheads of 4mm ply on the shopbot. Sooo much faster than hand fitting. This worked great as you can see in the pics. The discrepancy between the bulkhead and the hull in the 1 photo where it is obvious occurs on the way to the bow where the deadrise angle must increase. Eventually at the bow, the angle is 90 degrees so there has to be some compromise there. The rest of the bulkheads fit like a glove.

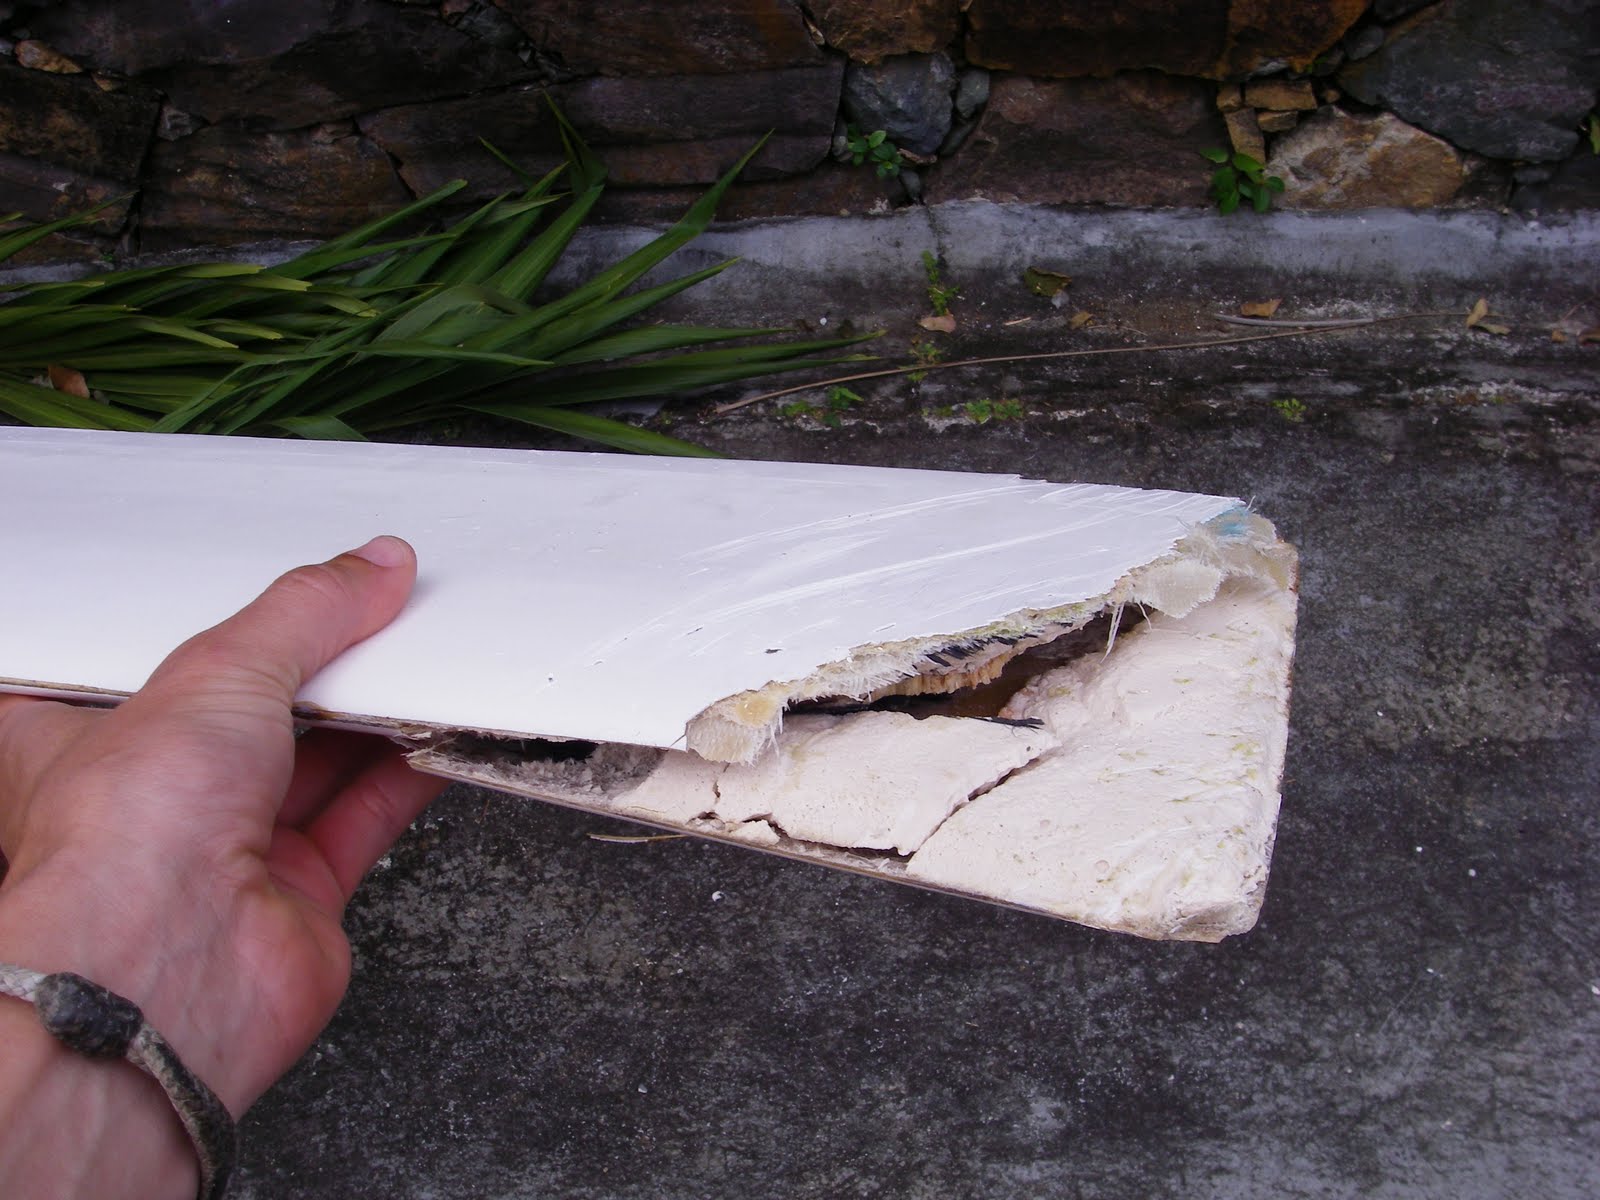
At the start of initial torturing 2 cracks alerted me to a problem which was recognized at the finger joints. One of the fingers opened up on the outside as tension was placed on it. Work was put on hold until the joints were glassed in the area of maximum curvature. This is the joints weakest bending axis. They are strongest in axial loading such as overall compression or tension of the entire ama structure. This problem was not seen in the main hull presumably because the whole bottom panel was glassed before bending.

Once the patches were kicked, the torture continued. In the end, I was able to get all of the bulkeads glued and filleted and the stem joined tonight, just 3 and a half days after cutting the panels.

Tomorrow, I plan to turn the ama upside down and apply boiling water soaked towels to the outside of the skin in hopes of relieving some of the stress that is built up in the sheet before epoxy encapsulating.

Saturday, September 24, 2011

Weighing in

It's been just about a month and a half since I cut the first wood for the boat. I spent the better part of 9 months designing in Rhino 3D and I am up to saved version 103. I have 12 ama iterations and about 6 of the main hull. All that and I'm still making major changes to the boat. Such is boat building.

A few days ago I removed the temporary frame that held the sheer line in place while I was installing stations. I've been anxious for that because it meant I could weight the hull. Drum roll.....62lbs as it sits. That is minus a couple of bulkheads, stringers, cabin sole, seats, cockpits, hatches and of course epoxy coating. It's heavier than I had hoped but not a death sentence. She is still on track to be significantly lighter than any production multihull of this size and power.

Below are the visible epoxy marks of a bulkhead that didn't make the cut. It's not that I put it in the wrong place, its just that I moved it after it had already been installed. Oops.

I'm closing in on the last few bulkheads. Once they are all in, I will be able to install the stringers for good, epoxy coat the inside and start closing it up. There isn't really that much in this hull.


One down side so far has been the artform that is tortured ply in a 1 off scenario, there was no way I could predict the exact section shapes and no one has built this hull before. Sometimes you have to let the wood do what it wants to do. All of the bulkheads in the main hull have been painstakingly patterned and hand fit. This just won't do for the amas. I need to speed up construction so I'm working on a more precise way to predict the ply shape so that I can CNC cut the bulkheads and have two identical amas. This will hopefully speed up construction. Stay tuned. Amas are on the horizon.


Tuesday, September 20, 2011

Steady as she goes

Foreword: Awesome work being done on "The Rise" which is the last remaining Wa'apa that sailed to an amazing Everglades Challenge finish after being built by some crazy college students back in 2007. For a history lesson, just dial back this blog a few years. It's great to see her sailing again at http://redbeard-hazard.blogspot.com/ . And she makes her return to the racing scene in under 2 weeks at the North Carolina Challenge under Captain Redbeards command.

The new screen I bought is quite amazing. (HP 2311x) It is a far cry from the 10.5inch screen of the netbook that I have been doing all of my design work on thus far. "Holy cow, now the whole boat fits on the screen. Oh thats much easier!"

Below, securing of the 4 partial bulkheads that will support the floor of the main cabin. Nevermind that the "main cabin" is the size of a sleeping bag. Notches are for longitudinal stringers (11mm x 25mm of Western Red Cedar) of which there are 4 plus the keel batten. The floor will also act as a longitudinal stiffener.

Below, a dry fit of the bottom stringers. They must be slid in from the still open transom after all bulkheads are installed. One disadvantage of building from the outside in. Seems to work fine so far.

View forward from the transom. Far bulkhead is the approximate position of the mast. Note limber holes for drainage. The cabin floor will be semi-self draining with holes to the outside to allow a large amount of water to escape automatically. floor hatches will be "water resistant".

Unfortunately for now, the weather is conspiring against me again. The bulkheads that I cut and fit last night no longer fit the hull as the humidity has swollen the sides of the boat just enough to cause a significant gap. Open air shops can be good...and bad. Hopefully I can sun dry the hull soon and get back to work. A coat of epoxy in it's dry state might be next on the list. In the meantime working on cut files for the Amas.

Interesting geometry problem below related to my hull swelling. If you haven't seen it before, the answer might surprise you or maybe not depending on how much of a nerd you are. In any case,

Say I place a 25,0000-mile-long metal band snugly around the earth. (Assume a smooth planet.) Then I cut the band and splice another 50 feet into it, thus loosening it all around. Can I get my finger between the new-length band and the earth? Can I crawl under it?


Friday, September 09, 2011

Irene Aftermath

We have only now just begun to return to normalcy here at the shop. Irene brought with it a 9.3 foot storm surge into Chapel Creek in our section of the Bay River. One of our boat shops flooded 50inches above the floor. Our "high and dry" shop still received 16inches. Irene sucks.

Some of the tools have come back to life after careful cleaning. Our shop bot tool is now operational again. A new computer had to be ordered. I spent a week remodeling the interior of my small cabin with new insulation and wall panels. I had about 15inches of water in my "house". Work has resumed on the 45' power cat and on the trimaran. Another update maybe next week.

The Trimaran main hull was on a pair of short sawhorses in the higher shop and the hull was "splashed" but suffered no damaged. There is a tub-ring type line around the bottom of the hull. At least now no one can say that I didn't put it in the water before the race.


Wednesday, August 24, 2011

Step into my office

The Hull is tortured 4mm plywood. Unlike conventional tortured ply cat hulls, I used 3 panels to form the initial shape seen in the previous post. This allowed for a more semicircular cross section with plenty of rocker. With a traditional 2 panel and keel joint, a more V'd bottom is required for the same rocker.

Hull shape finalized. Bulkheads and stringers going in next.

2x4 technology here. A compression strut used to force the
bottom down and narrow the hull.

The first bulkhead. Note also that the inwales and keel stiffener are installed now. The outer 1x2 gunwales are just a form for the hull and will be removed later. I got a bit greedy on the transom shape and wasn't able to pull that much curvature out of the panels so I cut into the joins about 18 inches forward from the aft end and wired them together so I could "reset" the joint angle and narrow the transom further. This angle could have been set when I joined the panels in the first place but this is an experimental 1-off so we go with the flow.

On the cutting edge. Note, again the temporary 1x2 gunwales. She has about a 10 degree half angle of entry so I expect very little wave making resistance from this hull shape.

Friday, August 19, 2011

Trimaran

The design and construction of the trimaran for UFC 2012 next march has taken over my life. The goal is to be sailing her by the end of November. I won't be doing any in depth posts about the build but I will post pictures whenever I feel like it.

Folding up the main hull. First Panels are joined, not much of a boat yet. How did I know what shape to make the panels so that it folds up into a sleek and sexy hull you ask? Well wouldn't you like to know.

Main hull almost to final shape. Compression posts will be used to force the bottom to the final depth which will flatten the sides and narrow the shape further. More pics to come.

Wednesday, June 01, 2011

Fishing is Hard

Second try fishing off the dock in Chapel Creek off of the Bay River. I was able to catch some minnows off the dock with a little net but this is all I could manage to catch. Need some smaller hooks (lots of bites and lost bait) and... some better bait. I want a flounder BAD.

Monday, May 02, 2011

A Slightly Longer Commute

Some pictures from this week. I've been working on my hatches and Sunday I took the boat out for an overnight in Swan Creek to meet up with Steve on Spartina and another sailing friend who is sailing around the outer banks for the next 2 weeks. Steve was just wrapping up his "walkabout" trip and it was fun meeting up with them and getting the boat out on the water. This morning, I had a slightly longer commute back to work. A 16 mile sail back to Chapel Creek from Swan Creek out in the Neuse River. Sailing to work... allllright, now I can check that off my list.
Hatch Mold. 3 coats of honey wax and 3 coats of PVA partall release film.

Hatch mold with part under vacuum bag.

Drip ring hatch frame installed in port side.

Sailing out to Swan Creek from Chapel Creek. 16 miles out the Bay river and hang a right.

A beat out the river, some paddling around Maw point and a staysail reach down to the creek.

A relaxing sail. Very glad that I got the boat back in the water. I started working on the hatches a couple of weeks ago and wasn't finished but some ducktape and red plastic board fixed that temporarily as you can see in this picture. I'm sure Steve will have some good pics on his blog from his trip over the weekend. Can't wait to read his report.

Thursday, April 28, 2011

Boat Hatchathon

I just finished laying up a fiberglass hatch frame tonight (the first of 4) that will go into the CS17 Southbound to replace the old hatches and shore up the seat tops. An advantage of living at a boat shop is that there are lots of scraps of material. This frame is made of recycled fiberglass which would have otherwise ended up in the garbage. Big boats make big scraps fortunately.

There are some hairline cracks and some delamination in the seat panels that I wanted to seal up and the old hatches were needing some love. My stomping around on the seat tops during the last few outings on the boat didn't do them any good either. I decided to just make some "stock" CS hatches off of Graham's trusty hatch frame mold that will be more watertight and strengthen the seats as well. I want to try resin infusing one of these but I really needed to get a move on since you can't sit in the boat without the hatches in. This one I just layed up and vacuum bagged conventionally. There have been some really nice sailing days lately that I have had to pass up. Plus if I really get it in gear, I may be able to meet up with Steve on Spartina on Sunday who has planned a multi day trip in the area this weekend.


Thursday, April 14, 2011

St. Thomas Vacation

Taylor I just returned from a 5 day romp in St. Thomas USVI. Originally planned as a training trip for the upcoming (and now cancelled) Tybee 500 catamaran race we turned it into a great vacation with friends and some great sailing thrown in for good measure.

Sign outside a snack bar on the East End

We stayed with friends of mine, another Alan and his wife Cristina in their new home on the north side of the island. He owns and operates 104.3 "The Buzz" radio station serving the USVI and Puerto Rico with nonstop rock and roll and he organizes a lot of charitable and community oriented fund raisers and events through the station. He's a busy guy but knows how to have fun. After being reintroduced to cat sailing a few years ago when Trey and I flew down to do the Rolex regatta he has been with it ever since. He now sails a Hobie 16 and last year he raced in the Tybee 500. Another mutual sailing friend Mark owns a Nacra 20 on island and he was nice enough to let us use it during the trip. Thanks Mark, it was great sailing with you.

Team Alan rig the Nacra 20 for warp speed and maximum ferry chasing capability


Mark- "Hey, you guys can use my boat, no problem, here are the sails, lines, rudders..."
Alan- "Mark, we will take really good care of it."
Mark- "I know you will"

We had a great time blasting around Pillsbury Sound but the above is why we felt really bad about accidentally sailing into a very small and obscure coral patch off of St. John outside the ferry channel. After impact, we managed to keep the boat upright despite Alan's trip to the tip of the spinnaker pole. Afterward, Team Alan limped back to the beach clutching the unfortunate dagger board and generally feeling just SICK about the damage. The starboard daggerboard also known as the "good news board" as well as the hull itself fortunately suffered no damage

As predicted, Mark thought nothing of it and wanted us to take the boat out again the next day. "Just switch the board, you'll be fine". Mark your the nicest guy ever. But no, we picked up some epoxy and glued it back up Wed. night. Just needs some good filler and gelcote and it will be a fine spare but we've got a lead on a new one for him. The least we could do.

"Hey Alan, that water looks kind of funny..." Crunch.

It was a very memorable island vacation thanks to Alan and Cristina's generous hospitality and we can't wait to get back down there again. Maybe for a sailing trip from St. Thomas to Puerto Rico? We'll see.